
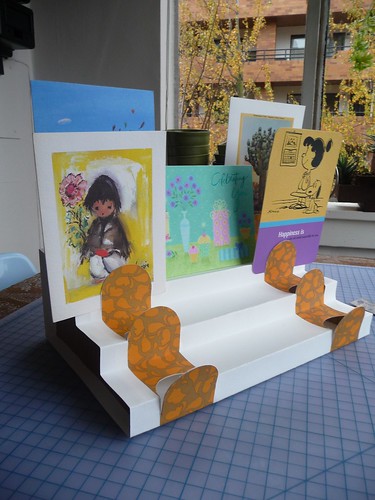

I had the idea for a card stand the Christmas before last when I think I made up a less pretty, all black version. Since I had some birthday cards laying around, and with Christmas coming up, I thought I'd give this project another try. And I took pictures along the way so I could try out writing up a tutorial for a change! Just before thanksgiving seems like the perfect time to try this out.
So, should you wanna make one too, you will need:
Tools:
Cutting mat
X-acto Knife
Circle Cutter
24" Metal Ruler with Cork Backing
Glue
Materials:
Strathmore Paper - for the pictured size a 12.5"w x 26"l piece, & width can be adjusted based on preference.
Chipboard - At least a 5"x8" scrap will be needed.
Pretty Paper - I used 1 12"x12" sheet, cut into 4 2" wide strips
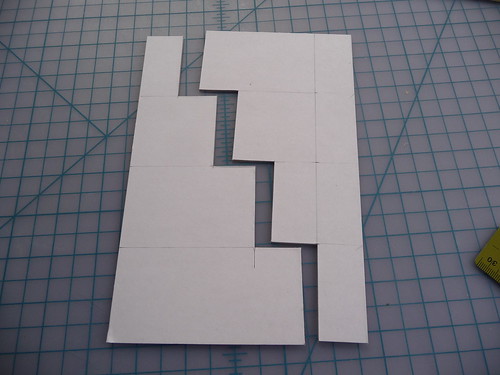
First I cut out the supports, one for each side to stabilize the "bleachers." I cut out a 5"x8" piece of a chipboard I happened to have lying around. (It's handy stuff!) I decided on a 1" rise (height) and a 2" run (depth) for each step. The 2" was based on taking a look at how much space an open, free-standing card takes up, and the 1" rise just looked right to me.

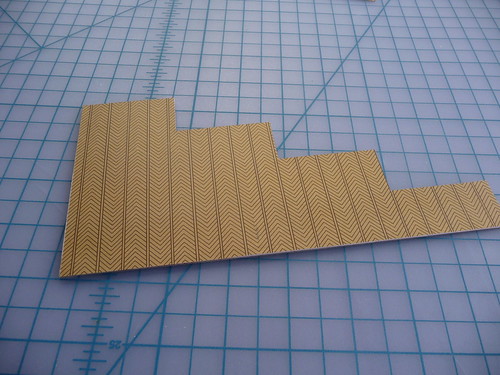
I wanted these to look a little nicer this time around, so I also cut out some decorative paper and glued it in place. Note in the picture on the left, I actually have two pieces facing in the same shape, facing out in the same direction. This is incorrect, one needs to be an opposite. I corrected this later, but didn't manage to snap a shot. Put these under a heavy book or something similar and let them dry a bit.
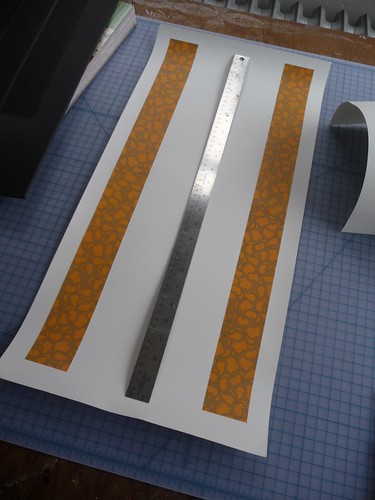
I pulled out my sheet of strathmore paper and marked fold lines on the backside. Again something I had around, and happened to have a rectangle about about 12.5" width and 40" long. It's a little hard to see in the picture, but the first horizontal line is 5" up (for half of the bottom plus a little overlap,) then 1" up from that, then another 2". The 1" and 2" pattern is repeated until you have four repeats of it. Then there are two more lines, one at 4" (the overall, end height.) and then the last one at 5" for the other half of the bottom. That comes to a total flat length of 26".
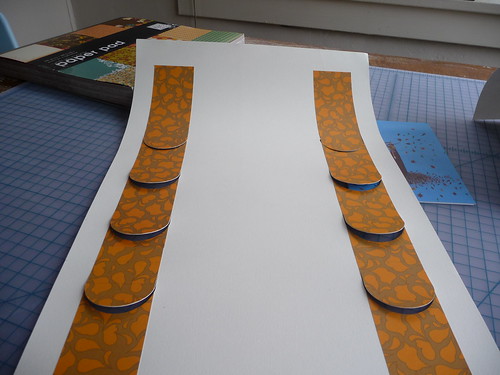
I cut my decorative paper into 2" strips, based on the smallest size my circle cutter would make. I cut out 4 of these strips, so they had to meet in the middle. I measured to make sure that happened on one of the 2" runs/horizontal portions so it would be less visible. I made a few marks to keep them spaced one inch off each side and glued them in place.
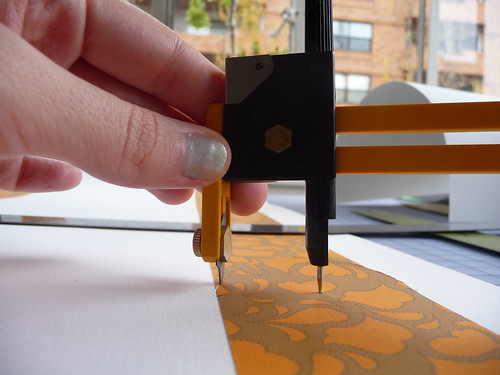
Once these dried, I started cutting circles. Circle cutters are fun. Since the marks for the folds were on the back/inside side I had to make a few marks on the front to make sure these started in the right place. I kept those marks on the decorative paper where I felt they'd be less visible. I cut only a half circle, which was cut entirely out of the 2" run/horizontal. I then took out my X-acto knife and ruler to cut a straight line, starting at the end of the cirlce, and going into the rise of each step 1/2", although in retrospect, the cards would stay up a little better and I would reccommend 1/4" or perhaps less. Just enough for the card to be gripped between the flap and the paper. In total I cut 8 of these flaps:
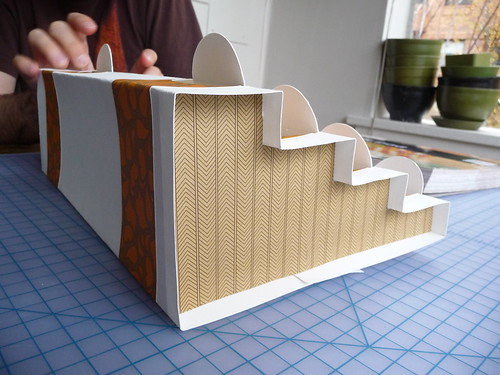
The next step is folding. Flipped the paper over to see my fold lines. We (Chuck came by and started helping me) scored the folds that needed to be folded on the front/decorated side using the backside of the knife. The for the rest of the folds we used the ruler to help keep a straight line. Be careful of the flaps, they do not get folded. This (on the left) is what it looked like before it all got glued down.:
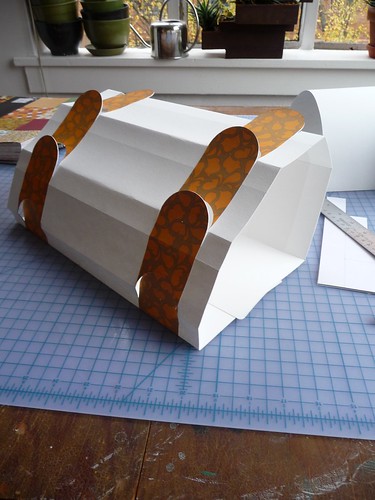
Then Chuck helped me run a bead of glue along the edges of the support pieces. We decided to set these in a little bit, about 1/2" so they didn't have to be too precise and wouldn't ooze out glue at the edges where it would be visible. It's handy to have two people for this (but I think, doable with one) pushing in all the folds into the steps of the supports, giving it structure. The bottom is a bit tricky, we ended up using a bit of tape to make sure it stayed down. If you happen to have a dowel or something tall and pokey (a poking stick!) you could maybe use that to make the glued overlap stay down, but we were alright with the tape.
Additional pictures, in order are in this flickr set.
3 comments:
ecco shoes
canadian goose
canada goose outlet
louboutin shoes
nba jerseys
hogan shoes
prada shoes
pandora charms
jordan shoes
jordans
important source Dolabuy Louis Vuitton find this look what i found check this link right here now check it out
from this source Ysl replica important source Loewe Dolabuy check my site Dolabuy Balenciaga
Post a Comment